How to Add a Lean to Onto a Shed
How To Build An Attached Carport
By Monte Burch
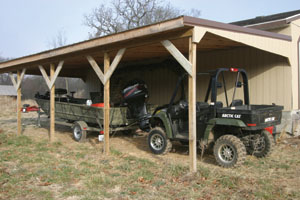
A carport, or lean-to shed, attached to an existing building such as a garage, barn, shed or the side of your house can provide economical shelter for vehicles, garden tractors, boats or other equipment. An attached carport is also fairly easy to construct against the side of another building, if you have enough height under the existing building eave.
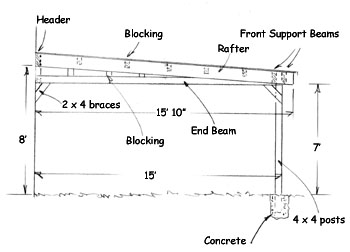
End Drawing.
The carport/lean-to shown uses basic and simple pole-building construction techniques, and was added to an existing workshop. The outer end of the shed is supported by Wolmanized pressure-treated 4-by-4 posts. And because the outer fascia is exposed to the weather it is constructed of 1-by-6 pressure-treated materials as well. Lightweight, but strong, metal is used for the roofing. A somewhat different approach was used for the roof framing. Traditional pole-building, metal-roof construction consists of 2-by-4 purlins fastened on edge across the rafters with the metal roofing fastened down on these. This allows a space where sparrows and other birds can get out of the weather and even a place to build their nests, with the resulting mess. Our design utilizes 2-by-4 blocking positioned between the rafters and located against the top edges of the rafters. This prevents birds from resting under the roof and keeps droppings off boats, cars or other equipment.
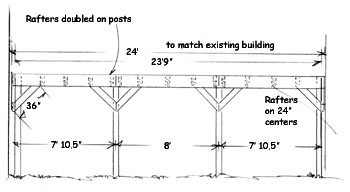
Side Drawing.
The shed shown, withstood 3 inches of ice and an additional 18 inches of snow, which fell this winter. The design may, however, not be strong enough or have enough roof slope for some high-snow areas. Check with local building codes and regulations. The shed shown is 24 feet long to match the existing building length, and 15 feet deep. The latter allows for standard 16-foot 2-by-6's for rafters. You may have to alter the design somewhat to suit your existing building height, length, even the width if you desire a narrower shed. It's a good idea to make a rough sketch of the building, to determine the roof pitch, number of support posts needed and so forth.
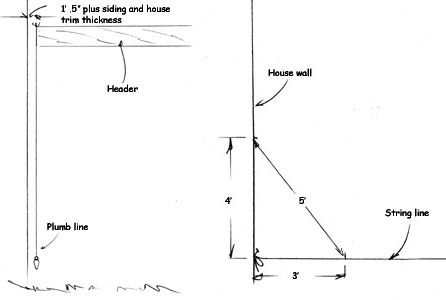
Left: First step is to anchor the support header to the existing building, and drop a plumb line from each end. Right: The next step is to determine the locations of the outer support posts. lay out the building using the triangle method and string lines.

Getting Started
First step is to locate and install the support header on the existing building. The end of the header should set back from the edge of the existing building by 1/2 inch, plus the thickness of any siding and trim that will be added. Mark the location of one end of the header and then mark the other end. Make sure the header is level end-to-end. Fasten the header in place with lag screws through the siding and into the studs of the existing building. Drop a plumb line from each corner of the header and mark this location on the bottom of the existing building. This will give you a starting point to layout the building and determine the location of the support posts. Beginning at one plumb line mark, attach a string to the building. Measure the length needed for one end, drive a stake and fasten the string in place. Beginning at the second plumb line mark, measure for the opposite end, temporarily drive a stake and add a second string line. Measure the distance between the two plumb-line marks for the length of the carport. Measure between the two stakes and adjust the stakes as needed to achieve the same distance.
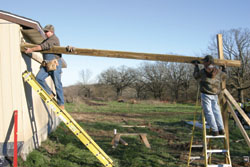
Once the posts have been allowed to set, install the two end boards, actually the outer rafters. With a helper, hold the boards up in place and determine the pitch and/or outer roof height. Mark the outer roof height (bottom of the rafter) on the end posts. mark the angle of the rafter end as it rests against the header and existing building wall.
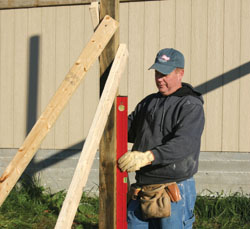
Once the post locations are determined, dig holes for the pressure-treated posts. Make sure the posts are plumb, then brace in place with temporary 2×4 braces. Pour Quikrete around the posts. Add water. Then tamp the dampened Quikrete material solidly around the posts.
Make sure the carport is laid out square with the existing building. One method of ensuring square is with right angle string lines. Beginning at one of the plumb line marks, measure 3 feet out from the building on the string and mark this with a felt tip pen. Measure 4 feet along the building wall and mark this measurement as well. Measure diagonally between the two marks. The measurement must be 5 feet to create a square corner. Move the string-end stake in or out to achieve the correct measurement. This creates a square corner for one end of the carport and determines the location of the corner post. Repeat for the opposite end and corner post. Then, again measure between the two stakes to make sure the length is correct. You can also check for squareness by measuring diagonally from the plumb line marks to the opposite outside corner locations. The measurements should be the same. With the corner post locations determined, run a string line from corner post to corner post and mark the locations of the other three posts.
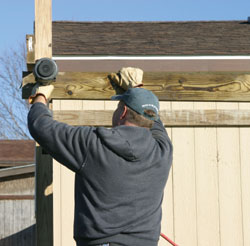
Position the outer front beam on the mark at the end posts and fasten in place to the next posts. Make sure the end boards are level.
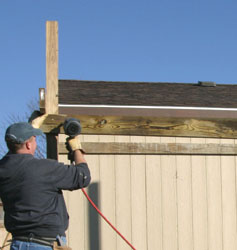
Doubled front beams support the outer ends of the rafters.

Attach joist hangers to the support header to hold the ends of the rafters.
Construction
The posts can be set on and anchored to concrete piers poured in holes in the ground. Or you may be able to utilize pre-cast piers. Another method is to set the posts in the concrete. In this case, pressure-treated posts must be used. Again, check with local building authorities as to methods suitable for your area. Regardless of the method of erecting the posts, make sure they are positioned correctly to create a square construction, again checking with a string and the triangular method. Also make sure the posts are plumb, bracing them in place two ways with temporary stakes and 2-by-4 braces.
With a helper, hold an end board (rafter) up against the existing house wall and against the end of the support header. Determine the location of the end rafter on the end post, as per pitch or outer roof height needed. Mark the rafter bottom edge location on the end post. Also mark the angle of the end of the rafter against the existing building; it must be cut so it will fit snugly against the building wall. Measure for rafter length, allowing for overhang, and cut the angle. Cut the same angle on the outer end of the rafter as well. Repeat for the opposite end of the building. Then use one of the cut rafters as a pattern to cut the remaining rafters.
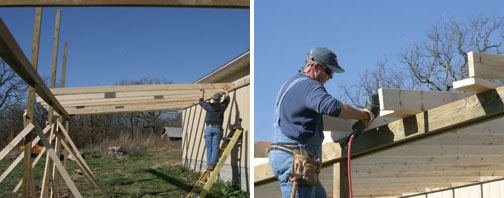
Left: Cut the rafters to length and cut the angle on the building end to match the angle of the building support header. Cut the opposite end at the same angle and the fasten the ends into the joist hangers. Right: Attach the outer ends of the rafters down on the top plate with metal hurricane braces.
Fasten the front support beam in place to the posts, locating it below the rafter bottom edge line marked on the posts. This beam is actually made up of three 12-foot lengths on the building shown. Make sure the beams are level. Locate the positions of the rafters on the header and fasten joist hangers in place. Fasten the rafters in place in the joist hangers with their outer ends resting on the outer support beams.
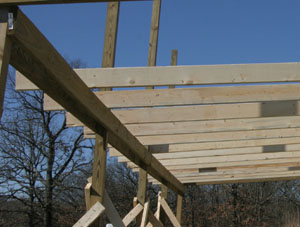
An inside header provides additional support.
Fasten the opposite end of the rafters to the support beams with metal hurricane bracing plates. Cut the post tops level with the rafters. Fasten a second inner support beam up against the bottom edges of the rafters and to the inside of the posts. Cut the end support beams. Note the outer end may have to be cut at an angle to fit up under the rafter, depending on roof height and pitch. The existing building end must be fastened to a block anchored to the existing wall. The outer end is fastened to the post and/or rafters. Cut blocking pieces to fit between the end rafters and the end support beams. Fasten in place on 24-inch centers by toenailing one end, or use angle braces.
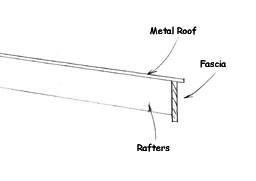
The outer fascia is added to the ends of the rafters.
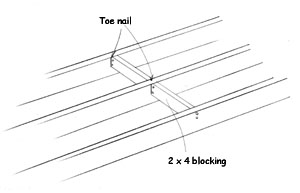
Blocking between the rafters provides nailing support for the metal roof.
Next, cut and install the braces. The front braces have a 45-degree angle on both ends. The end braces are best cut by first cutting the bottom 45-degree angle, positioning a brace in place and marking the top angle to fit the end beam. With the end braces in place, cut and install siding over the ends. You may also wish to add trim around the ends to match the existing building. A fascia board is fastened to the front of the rafter ends to finish off the outer end.
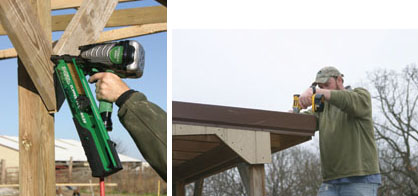
Fasten the angle braces to the posts an dunderside of the outer header. Then fasten the metal roofing in place.
The building shown was covered with metal roofing. The roofing is brown to match the shingles on the existing building. Other choices include a variety of polycarbonate materials, such as SunTuf. A gravel, or better yet, concrete floor, can add to the usefulness of the carport.
Tools & Supplies
- Support posts, 4×4" x 10', 5 req'd.
- Headers, 2×8" x 12', 2 req'd
- Joists, 2×6" x 16', 17 req'd
- Front beams, 2×6" x 12', 4 req'd
- End beams, 2×8" x 16', 2 req'd
- Front braces, 2×6" x 3', 8 req'd
- Side braces, 2x4x12", cut to fit, 4 req'd
- Blocking, 2×4" x 16", cut to fit between rafters, 80 req'd
- Roofing of choice, 16×24'
- Fascia, 2×8"x12', 2 req'd.
Recommended Articles
How to Add a Lean to Onto a Shed
Source: https://extremehowto.com/build-an-attached-carport/
0 Response to "How to Add a Lean to Onto a Shed"
Post a Comment